Generator
Although Editor's API has been carefully designed to be as accessible as possible while retaining maximum flexibility, it can be a little daunting at first. To help get you get kick started with Editor development (or even to speed things up for veterans!) Editor's Generator is available on this site.
You provide Generator details about the table to edit and it will return everything needed to put the editable table onto your own server - it will even run the created table live on this server for you to try out before installing on your own. This can save countless hours of development time, which of course is what DataTables and Editor are all about.
Once you've entered the table and form information into Editor, you are able to download a complete package based on your input to get Editor running almost immediately. You can also see the HTML, Javascript, SQL and server-side scripts (PHP, NodeJS, .NET Core and .NET Framework) that Generator produces individually, so you can apply those to your web-site directly if you already have DataTables / Editor available on your server.
The following document describes the basics of how to use Generator, and then applies these ideas to produce a simple "to-do" list example.
Styling and software
When you start using Generator you'll notice that the first two options are for what styling and software options the package that is created should use. DataTables, Editor and its other extensions can be used with a number of different styling libraries, for example Bootstrap and Foundation in order to ensure that it will seamlessly integrate with the look and feel of your site. Additionally, there are a number of extensions for DataTables and Editor that add extra features and capabilities. The download options include field type plug-ins for licensed users of Editor, with field types such as WYSIWYG and AutoComplete plug-ins available.
The styling options and extensions can be included through their individual files, but in order to make things easier Generator provides a point and click interface to select the options you want. To activate the selector interface, click the Customise button in the Generator form. An overlay box will be shown and you can select the software you want.
The software will be included from the DataTables CDN. Additional libraries can be included at any time by using the DataTables downloader builder should you decide to add extra features in future. At a minimum jQuery, DataTables and Editor should be included in your package options. Buttons and Select are also recommended.
Example package
For the to-do list example we'll leave the default options selected, although if you wish to try a different style, click the Customise button and select one of the styling frameworks - Bootstrap is possibly the most widely used styling framework on the web.
Server and database information
The next section in the Generator form details with the server-side aspect of the package that will be created. The first item to be selected is what server type you want Generator to create the package for - there are four options:
- PHP - Creates a package that will run on a PHP 5.3+ server.
- NodeJS - Creates a package that will run on the NodeJS platform. Makes use of Express as the web application framework.
- .NET Core - Creates a cross platform .NET package that can be used with Visual Studio or any other editor.
- .NET Framework - Creates a Visual Studio project that will open in Visual Studio. The project is a C# Web API based project.
If you are using server-side environment other than these two options you can still use Editor and the Generator, but you will need to create the server-side script.
The second option is also important for the server-side: what database type you will be using. The three options are MySQL, PostgreSQL and SQL Server. The Editor server-side libraries can operate with other databases (notably Oracle and SQLite), but Generator does not currently produce SQL for these databases.
Also required is the database table name that will be used. You can use an existing table if you want to add web editing abilities to it, or create a new table using the SQL from Generator.
Finally in this section, a primary key column is also required for the table, which will be used so Editor can identify each row uniquely.
Example package
For our to-do example we are going to use MySQL and create a table called "todo". The following screenshot shows what the form will look like:
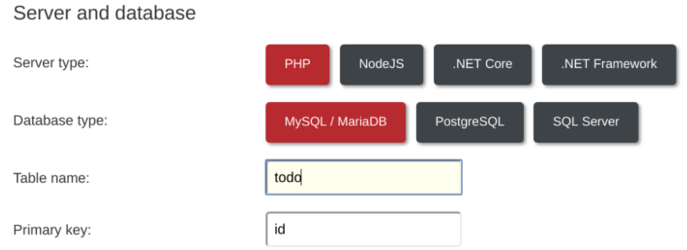
Table columns and form fields
The Form / Table section of the Generator allows you to specify the fields that you wish to have in your table and editing form. There is typically an overlap between the items which appear in the table and those that appear in the Editor form, but this doesn't always have to be true - Generator has the option of showing information in the DataTable but not presenting it as editable in the form, and vice-versa.
Only the basic options for the field are shown on the page - the title, type and optionally values (depending on the field type selected). A more comprehensive list of options are available for each field by clicking on the red Edit text just below the field.
You can add and remove fields from the table using the + option at the bottom of the table and the Remove columns at the right of the table for each column. Also the fields can be reordered by clicking and dragging the arrows shown at the left of each field.
Each field must have a label, an SQL column name and select a field type. The field label is used for the DataTable column header and the Editor field label (this is trivial to alter in the generated code if you wish to use different values for each). The SQL column is simply the name of the SQL table column that you wish to use for the field and the field type defines what field type will be used for the Editor interface. Depending on what value is selected here you may be required to enter additional information such as validation or optional values.
For our to-do list example set the form up to have three fields, with the values shown in the screenshot below:

With this all set up you can click the "Run now" button to see the resulting table in action. The test table will be hosted for one hour before being deleted. To run on your own server, please see the next section.
Downloading the package
With Generator now configured for your use case you can simply click the Complete package button at the bottom of the table and have Generator produce everything you need to upload to your server. Click the button and a zip file will be downloaded. Unzip this file to see the files that Generator has produced. Note that the file names are based on your table name (in our example here there will be a file called todo.html) - this makes it easy to produce multiple editable tables using Generator that uses the same media - you can put the generated HTML etc into this package.
At this point the instructions for various platforms diverge - jump to the section for the platform you are using.
PHP
Before uploading to your PHP server, there is one additional file that must be edited with the DB access information (this is not done using the Generator form for extra security). The file to edit can be found in php/lib/config.php. Open this file and alter the $sql_details parameters to include your database connection parameters. When edited your file might look like this:
<?php if (!defined('DATATABLES')) exit(); // Ensure being used in DataTables env.

// Enable error reporting for debugging (remove for production)
error_reporting(E_ALL);
ini_set('display_errors', '1');

/* * * * * * * * * * * * * * * * * * * * * * * * * * * * * * * * * * * * * * *
 * Database user / pass
 */
$sql_details = array(
    "type" => "Mysql",          // Database type: "Mysql", "Postgres", etc
    "user" => "my_db_user",     // User name
    "pass" => "my_password",    // Password
    "host" => "localhost",      // Database server
    "port" => "",               // Database port (can be left empty for default)
    "db"   => "my_database",    // Database name
    "dsn"  => ""                // PHP DSN extra information. Set as `charset=utf8` if you are using MySQL
);
And that's it! To run your newly created Editor table all you need to do now upload the unzipped Editor package to your web-server. Once that is done simply load the generated HTML page in your web-browser and enjoy your work.
Once you have loaded the page and the table has been successfully created you may wish to remove the CREATE TABLE statement in the PHP file to help improve performance.
NodeJS
Using a terminal, in the unzipped generator directory, install the dependency packages (e.g. Knex for the database connection, Express for the web framework, etc) by running:
npm install
Next edit the db.js file which contains the database connection information. This will look something like:
let knex = require('knex');

module.exports = knex({
    client: 'mysql', // pg, mssql, etc

    connection: {
        database:    'my_database',
        host:        'localhost',
        password:    'my_password',
        user:        'my_db_user',
        dateStrings: true
    }
});
Finally, on the command line again, start the Node program by running:
npm start
A message will be printed on the console with the URL that you can use to load the project in your web-browser.
.NET Core
The unzipped directory contains a Visual Studio project file which you can open and run directly in VS. The directions here will discuss how to run the project on the command line without Visual Studio, since that will work on all platforms supported by .NET Core. The basic idea is the same if you wish to use Visual Studio though - edit the database connection information and then run the project.
Edit the file Properties/launchSettings.json file. There are DBTYPE and DBCONNECTION environment variables available which should be set to provide your database connection (note that there are two instances for these variables, one for IIS Express and one for a generic web-server, e.g. Nginx, replace both with your connection detaiils.
DBTYPE- This defines the database type you are connecting to:mysql- MySQLpostgres- PostgreSQLsqlite- SQLitesqlserver- SQL Server
DBCONNECTION- This is the database connection string to connect to the SQL server. The exact format of the connection string depends upon the server being used, but typically it includes the server host name / address, user name and password. The Connection Strings web-site can be useful if you aren't sure of what connection string to use for your server.
To start the project run the following command in the same directory as the CS project file (.csproj):
dotnet run
Any dependent packages will automatically be installed and the http server will start running your project. A console message will be printed showing the URL to enter into your browser to load the project - e.g.:
Hosting environment: Development
Content root path: /home/datatables/Editor-NETCore-Demo/Editor NET Core demo
Now listening on: http://localhost:5000
Application started. Press Ctrl+C to shut down.
.NET Framework
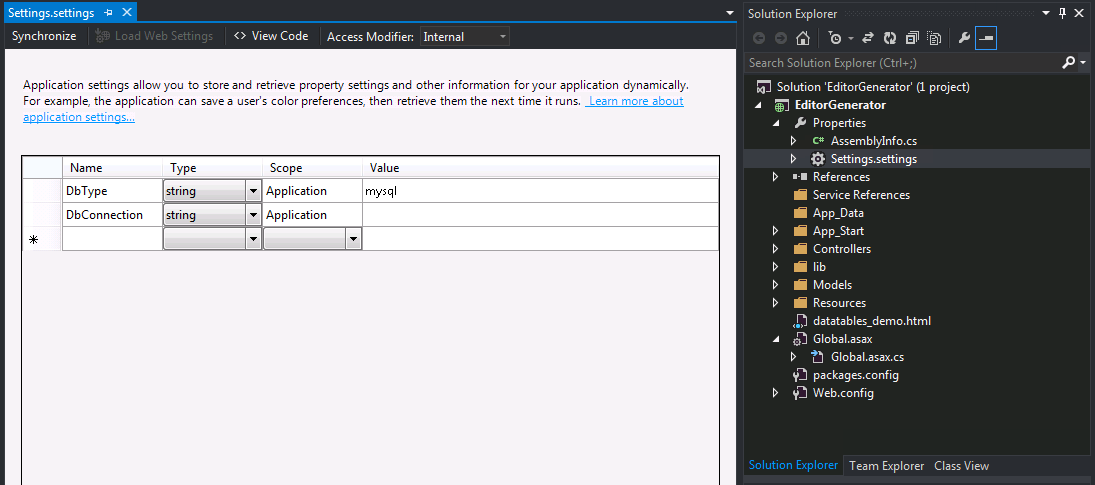
Once you have unzip the file downloaded by Generator you will find a Visual Studio project file. Double click to open the project in Visual Studio. To configure the package to connect to your database click the drop down arrow in the Solution Explorer for Properties. This will make the Settings.settings option visible. Double click to edit. There are two options in the project:
DbType- This tells the libraries what database type to connect to (see the installing documentation. It will be prefilled by GeneratorDbConnection- This is the connection string that defines the connection to your database. Use the connection string for your own database server (ConnectionsStrings.com can be useful if you don't know what connection string to use).
And that's it! To run your newly created Editor table all you need to do now is press F5 or click the Start debugging button in Visual Studio. The database table will be created for you automatically.
Once you have run the code you may wish to remove the CREATE TABLE statement in the controller to help improve performance.
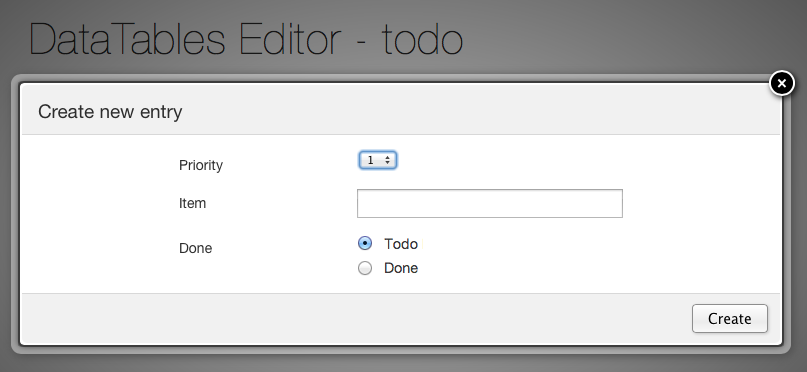
Completed example
If you've been following the to-do example, regardless of the platform you are using, the page created will look like this:
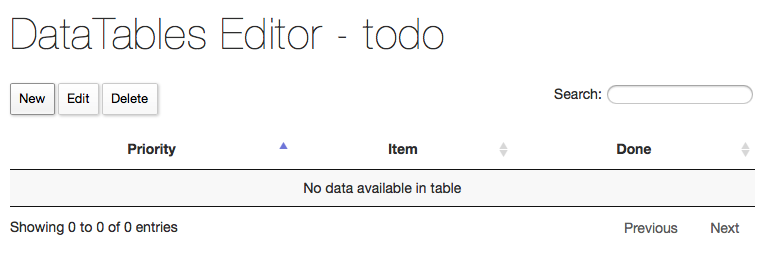
Click the Create button to start adding data to your table!
Next steps
Generator is intended as a quick start for Editor only - it is not designed to present every option that Editor has available to it. Once you are happy using Generator, you might wish to get to grips with the API, initialisation options and field options to further customise the interface as your requirements demand. Also don't forget that Editor has a number of plug-in options if you wish to extend its capabilities and display options further!